
- The microphone in the camera is of poor quality
- It's difficult to get the camera close enough to the sound source.
Audio
| Better Sound: About Microphones | Wired Microphones | Wireless Microphones |
|
KISS -- Keep It Splendidly Simple -- is the rule here. With audio, it seems Murphy's law applies with a vengeance. Anything that can go wrong probably will. The more microphones, wires and connectors that are used, the more buzz, hum and equipment failure is likely to occur. Many non-professionals believe that the microphone on their camera provides audio that is entirely adequate. Mostly they are interested in recording the voices of their subjects, along with ambient sounds -- the babble of a stream, the roar of the crowd at a football game, the sound of wind in the trees.
Unfortunately, most camera microphones are woefully inadequate for the job of recording good sound for two reasons: To record really good quality sound you must turn to an external microphone, either wired or wireless. |
 |
 As always, buy the best equipment your budget will allow. Companies such as Rode, Audio-Technica and Shure carry an extensive line of good quality audio tools. Many local stores carry these products. Music stores that cater to professional musicians are usually good sources of audio equipment, and are apt to have very knowledgeable staff on hand to help you.
 Audio equipment can be purchased by mail order. When purchasing via mail order, be sure to inquire about hidden costs, such as shipping and handling. Be sure to get the name of the salesperson who takes your order, too, and be sure to ask about the company's return policy. Re-stocking fees can be exorbitant. Probably the largest, most reliable and most helpful mail order house in the U.S. is B&H (800.894.9703) in New York city.
-
Top of Page
- Hum -- The audio (sound) circuit on many cameras today has what's called "automatic gain." When the circuitry detects the absence of sound, or a reduction in the sound level, it automatically turns up the sensitivity to sound -- in technical terms, the "gain" -- until it registers incoming sound, or until it can't go any higher. As the gain increases, the audio circuit detects and records the hum from the electronic elements in the camera.
- Low Volume -- This is usually caused by the camera being too far away from the sound source.
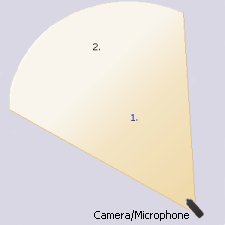
- Background noise -- This results to a large extend from the automatic gain and the distance between the microphone and the primary sound source. As the illustration (camera/microphone) indicates, the closer to the camera the speaker, the less peripheral sound is being picked up by the microphone.
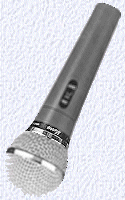
The Solution -- Use an external microphone. Many newer video cameras -- some older ones, too -- have a "mic in" port, a receptacle into which a microphone plug can be inserted. An external microphone -- a "mic" -- can be purchased for as little as $35 to $40. Unfortunately you get what your pay for; a more expensive mic will provide much better sound. With an extension cable, a microphone can be placed as far as 30-40 feet from the camera and still be only a few inches from the sound source.
Lavaliere (tie-clip) mics are excellent to use when taping interviews and speakers. They are small and unobtrusive, yet yield very good sound.
The placement of lavaliere mics is very important. Remember the "inverse square rule:" every inch the speaker turns away from microphone reduces volume by the square of the distance. Four inches away reduces the volume by a factor of 16.

The white dots on the illustrations indicate the best location for a tie tack (lavaliere) microphone. 
Judy and I, chatting on camera at the ball game, look at each other as we speak. The microphone placement assures maximum coverage. We could probably get by with a single microphone, but we'd be assured of better sound if we each had one.
For multiple microphones, a "mic mixer" is used: it enables the sound from multiple microphones to be combined and passed onto the camera as a single signal. Low cost but very effective mic mixers can be purchased at many consumer electronics stores.
And a final suggestion: If your camera has a receptacle for a headphone plug, get a headphone. That way you'll be able to hear what the camera hears. It can make the difference between a mess and audio that sounds great!
Wired Microphones
With wired (or cabled) microphones, a wire connects the microphone to the camera through the camera's Audio In or Mic. port. Microphones such as this are either hand-held or placed on a stand, or are of the lavaliere type, hung from a cord or strap around the speaker's neck or pinned to the jacket or shirt.A disadvantage of the wired microphone is that camera and speaker are attached. Where ever one goes the other must follow. Wired microphones works well for a stationary speaker, but are not very effective for the speaker on the go.
Also, if the cable is more than 10 to 15 feet in length, someone must act as a "cable puller" and make certain the cable isn't getting wrapped around the furniture if the speaker and camera operator do move.
 One way around this, of course, is to have the microphone fixed on a stand, with the speakers approaching the microphone. This works well when speakers are at a podium, for example, but there's always the risk that the speaker will move away from the podium, thus significantly reducing the effectiveness of the microphone.
 Be sure to use shielded audio cables for your microphones. This will cut down considerably on outside interference. And if possible, use a headset to listen to the sound coming in from your external microphone. Any interference you hear will be recorded by your camera.
Better Sound: Using a Microphone with Your Camera
|
Your camera has a build-in microphone, capable of doing a pretty good job of picking up sounds from a few feet away. But as the distance between you and the sound source increases, the quality and volume of sound decreases rapidly.
Logic would suggest that if the sound source -- the speaker you are video taping -- at #1 is moved to position #2, the level of sound reaching the microphone would be halved, since it is now twice as far from the microphone as it was. In fact, because of what is known as the inverse square law (which you can find spelled out in Wikipedia) the sound level is quartered. It's not just a little weaker, it's a lot weaker. The Problem We're often asked here at VideOccasions to "do something about the sound" on a video tape or other digital mediam. Usually there's lots of hum, the volume is very low and there's quite a bit of background noise. The Causes
|
 |
Wireless Microphones
A "wireless microphone" is made up of two components: the microphone, which is attached to a miniature radio transmitter, and the receiver, which works like a radio, receiving the transmission from the microphone.Wireless microphones may be hand held or on a stand, but are much more commonly of the lavaliere or pin-on type. There are even professional specialty wireless microphones, designed for use on stage or in film and video, that can be worn on a headband or hat, or hidden in the hair.
The advantages of the wireless microphone are obvious. The wearer and the camera operator have complete freedom of movement, although they must stay within 150 to 300 feet of each other for optimum reception.
The major drawbacks to wireless microphones are cost and the possibility of interference . Wireless systems start at about $250 to $300, with the top of the line being well in excess of $1000. Low cost wireless microphones can be obtained for considerably less than this, but may provide poorer audio quality. Try them out before buying, if you can.
 If you decide to purchase an inexpensive microphone, either wired or wireless, make certain that the store where you make your purchase
has a return policy. Write down the name of the sales clerk who waited on you, and be sure to keep the receipt.
 Interference has always been a major problem with wireless microphones. Most microphones today transmit in the UHF rather than VHF frequencies to provide interference free transmission. Top of the line systems have multiple frequencies from which to choose. If you must use a wireless microphone system, and can afford better quality, buy what's called a "true diversity" receiver. Receivers of this type automatically seek out an interference free frequency, unlike other microphone/receiver combinations which must be switched from one channel to another manually at both the microphone and receiver.
If there is one axiom to follow in the realm of audio it is this: always buy the best equipment you can afford. And if you can't afford the best you may be able to rent locally.
Last modified 3/19/2020
Designed for VideOccasions by Jack Wolcott
